

Moist (adj.) Being in a state of moisture.
“Water as and when the plant requires it.”
“Keep soil moist—not too wet, and not too dry.”
Have you ever come across “helpful advice” like this on a bag of potting soil or a feed chart?
When I first started working with living soil, I wanted to find a precise way of managing moisture content. It’s no secret that it’s easier to overwater soil-based potting mixes than soilless, so I was keen to find a way of really dialling things in.
It wasn't long before I discovered an instrument called a “tensiometer”—a tool that's completely transformed the way I approach soil moisture management. I’ve learned a lot from using tensiometers in my living soil research and development, so I thought it was about time I shared!
Why Traditional Methods Fall Short
Like many growers, I’ve often relied on the fairly manual method of simply lifting up pots and judging moisture content by weight (or back strain), or poking my index finger rudely into the soil. But living soil uses much larger containers—10 gallons (about 40L) is a bare minimum—and raised beds are often used too. When you're working with these large volumes of dense, organic living soil, a quick lift is out of the question! Not only are these pots or beds way too heavy, but the surface of the soil can be deceiving—it can look and feel dry while deeper down, there’s still plenty of moisture.
Understanding Tensiometers: Your Artificial Roots
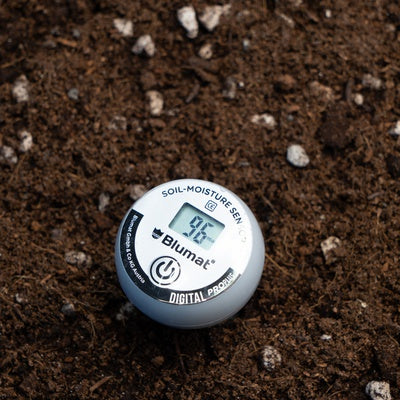
So what exactly is a tensiometer? I like to think of it as a sort of “artificial plant root.” A tensiometer is basically just a hollow tube filled with water, capped with a vacuum gauge at the top and a porous ceramic tip at the bottom that's inserted into your soil.
When the soil dries, it exerts suction on the ceramic tip and water inside the tensiometer. This suction from the soil—or tension—is what the gauge measures. The reading tells you precisely how hard your plants are working to draw water from the soil. A high reading means your soil lacks moisture, placing stress on your plants. A low reading indicates moisture is easily accessible.

Tensiometers are available from a few companies and come in a range of sizes. The most common and cost-effective model is the Blumat Digital. This has a maximum measurement depth of approximately 8” (20cm), and is effective for pots or beds. Irrometer make higher-end tensiometers that use a dial vacuum gauge rather than digital and come in a wider range of sizes, allowing measurements to be taken up to 12” (30cm) deep, which is great for beds.
Tensiometers give growers invaluable clarity over their irrigation. Suddenly, watering decisions are straightforward and measurable, rather than based on guesswork or intuition.
Soil Tension and Volumetric Water Content
It’s worth taking time to appreciate the subtle and important difference between soil tension and volumetric water content (VWC). While VWC simply indicates how much water is physically present, soil tension is a measure that’s arguably conceptually closer to the plant’s physiology; it tells you how hard plants need to work to access that water. Two soils can have identical VWC readings with significantly different soil tensions.
For instance, using VWC meters as well as physically weighing the pot, I've tested our Eco-Life peat-based living soil alongside our coco-based Living Soil, and the results were eye-opening. At identical VWC, the peat-based mix consistently showed lower tension, meaning water was more easily accessible to plants. This made me realise why coco coir mixes perform better when run slightly wetter! I love those realisation moments where experiments and data back up growing experience—I now think of coco coir as a sort of “greedy sponge” when it comes to holding on to moisture!
While we are talking about peat vs coco coir, when coco coir is run at a lower tension (wetter), the physical structure of the media still has plenty of air, which is great for root growth and biological activity. Peat mixes generally tend to have a finer physical structure, so when you reach higher moisture levels (lower tension), there can be less air space, which is why peat mixes are often more sensitive to overwatering than coco coir. Can you tell I love coco coir? Haha!
How to Use Tensiometers
Tensiometers are generally placed where the action is—directly into your root zone, typically halfway down your container or bed with the ceramic tip around 6-8” (15-20cm) deep.
If you're working with large containers or beds, the ideal approach is to place multiple tensiometers tactically around the space. In beds, using a longer tensiometer such as the Irrometer LT 300 (which can measure up to 12” (30cm) deep) really helps get a better understanding of how the water fluctuates deeper down in the soil profile. Multiple readings can really give you special insights and a clearer picture of moisture distribution.

In my experience, the ideal range for tensiometer readings in living soil is around 40–100 millibars. When readings climb between 70–90 millibars, it's time to start thinking about watering soon. Anything above 100 millibars means your plants could be starting to experience some moisture stress. Of course, fine-tuning depending on your soil type is necessary to get dialled in.
When plants are in vegetative growth, most growers aim to provide consistent and easy access to moisture. When plants enter transition, it’s common to up the ante slightly and steer plants decisively into generative production with tensiometer readings up to 100–120 millibars. Once flowering has commenced, the soil tension can be reduced slightly until it’s time to induce senescence (ripening) towards the end of the cycle, when soil tension can be increased once more.
Practical Tips for Using and Maintaining Tensiometers
From my own trials and errors, here are a few key tips to ensure your tensiometers remain accurate and reliable:
- Leave Them Alone!: When you first insert the tensiometer into soil, it can take 6–24 hours before the reading stabilises. After this, they usually take 5–15 minutes to stabilise after watering. For this reason, it's best to leave a tensiometer in the same position rather than move them around. Tensiometers are also relatively wide probes, so moving them a lot can create unnecessary soil and root disturbance. With all this being said, it is worthwhile repositioning your tensiometer every few weeks, as roots can grow around the ceramic tip and start to give falsely high readings.
- Regularly Check Water Levels: Every few weeks, quickly inspect the tensiometers to make sure there's enough water inside. If the water level drops, refill it with clean water. Usually, the water level will only drop if there have been significant dry-backs. If you're using digital models, periodically check the battery condition.
- Proper Care Between Cycles: When harvest day comes, it’s common for growers to focus on post-harvest processes and leave their grow rooms in a sort of post-apocalyptic state until it’s time for the next run. As such, tensiometers can be left in drying soil beds. Firstly, you should avoid letting your soil dry completely between growing cycles, but it's also best to remove any tensiometers, service them, and store with the tip in water or moist soil before replanting. I've noticed that extremely dry soil can cause excessive vacuum pressure within tensiometers, permanently damaging the gauge; this can lead to inaccurate readings.
Maintaining Your Living Soil’s Structure
Over time, I've observed that living soils also change significantly. When organic matter starts to break down, the soil compacts accordingly and this, in turn, alters its capacity to retain moisture. Without accurate monitoring, it's easy to end up with dry pockets or overly saturated zones, both of which can have a detrimental impact on plant health and the soil’s vital microbial community.
It’s difficult to overstate the importance of maintaining soil structure. Coco coir and peat are organic matter, and this naturally breaks down over time, leading to higher water holding and reduced drainage—often called soil compaction. This can be seen over multiple cycles with living soil via a physical hand-squeeze soil inspection, but can also be picked up through your tensiometer readings. You will see a tendency for the tension to read lower for longer over time.
To counter this, I routinely amend my living soil with around 4–5% pumice every three or four cycles. These additions maintain a balance of air and water, ensuring even moisture distribution and enhancing the soil structure.
I also moved away from strictly no-till gardening to gently mixing in the amendments when preparing beds for a new cycle. Mixing the soil down to 8–10” (20–25cm) depth at the end of each cycle can reveal areas of dryness or compaction, and allows me to adjust watering strategies, keeping the soil consistently productive.
Precision Watering Gives Better Results
Since integrating tensiometers into my gardening routine, I've enjoyed dramatically improved consistency, healthier plants, and a thriving microbial environment. The guesswork of watering has been replaced with precise, measurable action, leading directly to better plant health and productivity.
I strongly encourage growers—whether you're just getting started or have been gardening for years—to explore the benefits of tensiometers in their own living soil practices. The initial investment in these devices quickly pays off through healthier plants, better yields and fewer headaches.
As the living soil revolution picks up pace and more growers move to this cultivation method, I heartily recommend investigating tensiometers as part of the transition. They aren’t just gadgets—they’re a central part of growing efficiently, consistently and successfully with soil.

Leave a comment
This site is protected by hCaptcha and the hCaptcha Privacy Policy and Terms of Service apply.